


LSMW Step-by-Step Guide in SAP

Updated: May 18
In the world of SAP, data migration plays a critical role during implementation, rollout, and support projects. One of the most popular tools provided by SAP for this purpose is LSMW (Legacy System Migration Workbench).
During SAP implementations, rollouts, or data migration phases, one of the major challenges is bringing legacy data into the SAP environment without compromising accuracy and consistency. LSMW bridges this gap by:
Simplifying the data load process
Allowing functional consultants to perform uploads without ABAP
Supporting multiple data migration techniques
Common Use Cases for LSMW
Here are a few common business scenarios where LSMW is widely used:
Use Case | Object Type | T-code |
Material Master Upload | Master Data | MM01 |
Asset Master Upload | Master Data | AS01 |
Purchase Order Upload | Transactional Data | ME21N |
Financial Postings | Transactional Data | FB01 |
>> Go to Transaction Code LSMW
Define Project, Subproject, and Object :
Project : A Project is the main container or top-level category for your LSMW task, you can create different projects for different clients, modules, or business processes.
Subproject : A Subproject allows you to break down your project into smaller components or phases. Useful when you have multiple data sets or when you want to separate work by teams or functions.
Object : An Object refers to the specific data you are migrating within that subproject. This is where you define the actual data structure and mapping task.
Level | Name | Purpose |
|---|---|---|
Project | FI_MIGRATION | Migration related to Financial Accounting |
Subproject | GL_MASTER | Focused on GL Master Data |
Object | FS00_UPLOAD | LSMW Object to upload GL Master Data |
STEP 1 : Click on Create to create Project > Subproject > Object

STEP 2 : Click on Execute button.

NOTE: In LSMW the Steps are always in Display mode by default so always change it to Edit mode to make any changes in in every step
There are typically 14 Steps in the LSMW process. Below is a simplified overview:
Maintain Object Attributes
Choose the import method (e.g., Batch Input Recording).
Here, you define the technical method you’ll use to transfer data from your legacy system into SAP.
You’ll select one of the following methods:
Batch Input Recording (most commonly used)
Standard Batch/Direct Input
BAPI (Business Application Programming Interface)
IDoc (Intermediate Document)
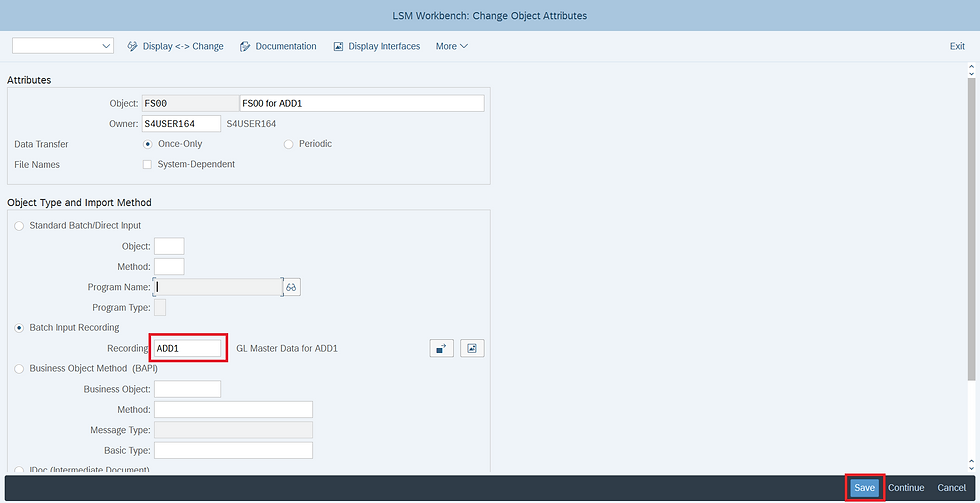
STEP 3 : Select Define Object Attributes and click on Execute

STEP 4 : After changing the screen to Change Mode > Select Batch Input Recording then click on Recordings Overview Button

STEP 5 : Click on create button and Provide the Recording Name & Description then Transaction Code of Screen for which you want to bring Create/Change.

STEP 6 : Create/Change in the T code Screen Entered so that the system can Capture it.

STEP 7 : Click on Default All then SAVE and Go back.

STEP 8 : Click on Recording Field or Select the Proper Recording saved from F4.
Maintain Source Structures
To define the structure of your input (legacy) data file - basically, how your data is organized before it's mapped to SAP fields.
STEP 9 : Select Define Source Structures and Execute.

STEP 10 : Click on Create & Enter the Source Structure field Name and Description.

Maintain Source Fields
Map the structure fields to individual fields from the legacy system.
STEP 11 : Before creating the Source Field, select Object Overview then click on Table

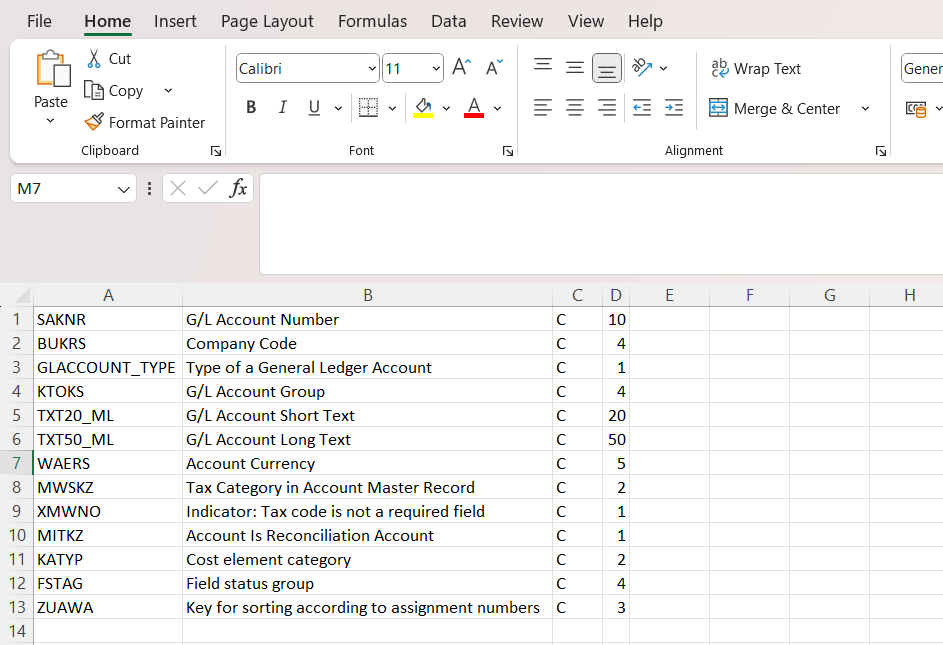
STEP 12 : Copy the below Highlighted fields except first Two fields.

STEP 13 : Paste it in Excel Sheet and Change the Type from CHAR to "C" for all
STEP 14 : Select Source Fields and Click on Execute

STEP 15 : then, position cursor on Source fields and click on Table Maintenance and click on SAVE.

STEP 16 : Copy the Fields maintained in STEP 12 and Paste it here

Maintain Structure Relations
To Link source structure to SAP (Target) structures.
STEP 17 : Select Define Structure Relations

STEP 18 : Position the cursor to Structure Relations and click on Relationship Button > SAVE.

Maintain Field Mapping and Conversion Rules
Map source fields to target SAP fields. You can also add transformation logic here.
STEP 19 : Select the Define Field Mapping and Conversion Rules and Execute

STEP 20 : Click on More > Extras > Auto-Field Mapping

STEP 21 : Without making any changes in Auto Field Mapping: Settings save it and the click on Accept Proposal by matching the Target Field and Source Field.

STEP 22 : Click on SAVE.

Maintain Fixed Values, Translations, User-Defined Routines
Optional step to apply rules and mappings.

To Prepare File
STEP 23 : Prepare the Excel sheet as shown below with Row 1 (Field Name) and Copy it

STEP 24 : Paste and Save it in txt file.

Specify Files
Upload or specify the location of the source file (usually a .txt or .csv file).
STEP 25 : Select Specify Files and click on Execute

STEP 26 : Position the cursor on the PC (Frontend) and click on Create
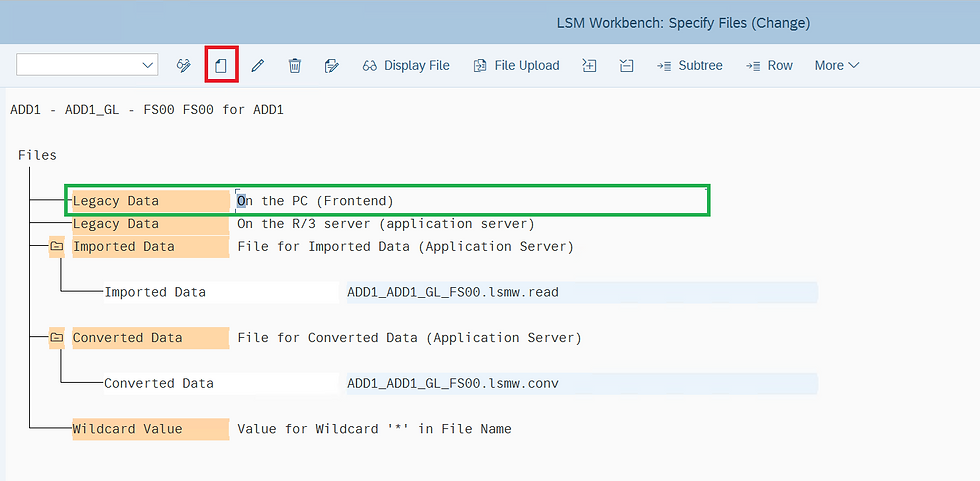
STEP 27 : Select the File and Enter Name of file.
Select the check box of Tabulator, Field names at start of file and Proceed

STEP 28 : Click on SAVE and Go back to main Screen

Assign Files
Link source files to source structures.
STEP 29 : Select Assign Files and click on execute

STEP 30 : Position the cursor on Source Structure file and click on Assignment

Read Data
Read the contents of the source file into LSMW.
STEP 31 : Select Read Data and click on execute button

STEP 32 : Click on execute and then allow

Read Data Records

Display Read Data
Review the imported data for accuracy.
STEP 33 : Select Read Data and click on execute button

Click on file to check the Information Captured

Convert Data
Convert legacy data to the SAP format.
STEP 34 : Select Convert Data and click on execute button

STEP 35 : Click on Execute

Converted Data Records

Display Converted Data
View the converted data before upload.
STEP 36 : Select Read Data and click on execute button
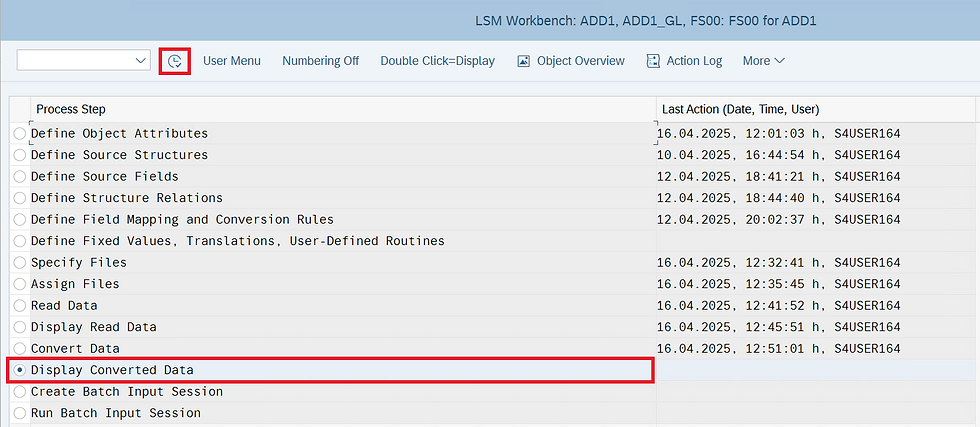
To Display Converted data click on any Row to see

Create Batch Input Session / Start Direct Input
Execute the upload into SAP.
STEP 37 : Select Create Batch Input Session and click on execute button

STEP 38 : Click on Execute

Run Batch Input Session
STEP 39 : Select the Batch Input Session and Click on Process

STEP 40 : You can Execute in either Background/Foreground.

Result :

Conclusion
LSMW remains a powerful and widely-used tool for data migration in SAP environments. Whether you are a functional consultant or part of a project team, learning LSMW can significantly reduce manual effort, minimize errors, and speed up your project delivery.
By mastering LSMW, you can confidently take ownership of migration tasks and contribute significantly during implementation and rollout phases.



XX88 giúp mình hình dung rõ hơn cách nhiều khu vực được kết nối khi mình thay đổi nội dung trong cùng một phiên. Mình thường chuyển từ Thể thao sang Esports rồi Bắn cá, nên mỗi lần đổi hướng cũng là lúc mình quan sát cách hệ thống đưa mình về đúng khu vực cần tìm. Các danh mục lớn đóng vai trò như những mốc khá rõ để xác định vị trí thay vì phải nhớ từng thao tác nhỏ. Khi đã quen với cấu trúc, việc quay lại phần trước đó cũng trở nên tự nhiên hơn. Với mình, cách tổ chức như vậy giúp hành trình có nhiều hướng lựa chọn nhưng vẫn giữ được một logic…
kuwin khiến mình chú ý đến phần hỗ trợ trong lúc sử dụng hơn là chỉ nhìn vào danh mục trò chơi. Mình thường quan sát xem khi cần tìm thông tin hoặc gặp vấn đề thì kênh hỗ trợ được bố trí thế nào, nhất là khi hệ thống có hỗ trợ khách hàng 24/7. Sau đó mình mới xem qua các khu như Bắn cá và Đá gà để hiểu thêm phạm vi nội dung. Mình thích cách kiểm tra từng phần như vậy vì có thể vừa theo dõi tiện ích đi kèm, vừa hình dung được nền tảng đang chia các khu trải nghiệm ra sao.
xx88 làm mình quan tâm đến cách một nền tảng duy trì sự khác biệt giữa từng nhóm nội dung. Mình bắt đầu từ nổ hũ và thử quan sát những tựa game có phong cách hình ảnh khác nhau như Mahjong Ways, Crazy Hunter và Dinosaur Tycoon. Từ hình ảnh mạt chược đến phong cách hoạt hình hay thế giới khủng long, mỗi trò đều có dấu ấn riêng. Sau đó mình chuyển sang khu thể thao để kiểm tra một dạng nội dung hoàn toàn khác với hơn 2.000 trận đấu trong ngày. Qua quá trình này, mình nhận thấy kho giải trí được xây dựng khá rộng, đồng thời từng khu vẫn có nét riêng để dễ nhận…
TN88 khiến mình để ý nhiều hơn đến cách giao diện phân biệt giữa danh mục chung và lựa chọn nằm bên trong. Mình thường đi từ phần tổng quan xuống từng mục cụ thể, nên cách phân tầng ảnh hưởng khá rõ đến cảm giác tìm kiếm. Khi vào Casino, mình có thể nhận biết Baccarat và Roulette là những lựa chọn cùng thuộc một khu vực thay vì những phần tách rời. Sau khi chọn trò, bố cục vẫn để lại đủ dấu hiệu để mình hiểu mình đang ở nhánh nào. Với mình, cách hiển thị như vậy khá dễ làm quen, bởi càng sử dụng mình càng hình thành được thói quen nhìn từ khu vực lớn…
xx88 là nơi tôi thường bắt đầu bằng việc kiểm tra cách các khu vực được sắp xếp trước khi đi sâu vào từng nội dung. Tôi thử mở từ trang chính sang khu vực giải trí, chuyển tiếp qua một chuyên mục khác rồi quay lại điểm ban đầu để quan sát khả năng duy trì ngữ cảnh. Nếu menu được bố trí hợp lý thì tôi có thể nhận biết mình đang ở đâu và chuyển sang nội dung khác mà không phải tìm kiếm lại từ đầu. Tôi cũng chú ý đến vị trí của nút quay lại, thanh điều hướng và các nhóm chức năng thường xuyên sử dụng. Trong quá trình đó, tôi quan sát cả…